Big news: I have completed basic training in web design. In order to serve you better, my web design blogging is now found at www.heidibada.com.
For art fans, an art section will be created to incorporate tutorials and work in progress as usual.
Thanks for following me there!
Thursday, 23 July 2015

Monday, 23 February 2015
More on the ball
Now I've finished adjusting some materials properties to produce dull and shiny metal surfaces, and glossy at the end. What do you think? It was quick and easy, at least for these simple shapes. One must remember to apply metal-effects settings to all the colours on the objects.
There you have it. Quick, easy, and right away you can imagine what you could do if your project involved cars, weapons, and other shiny or metal objects.
 |
| Attempted plastic ball |
 |
| Dull metal |
 |
| Shinier metal |
 |
| Ceramic (glossy) finish made obvious with dim lighting |
Blender 2-colour ball tutorial done, and it reminds me of IKEA
Quick summary: the tutorial for adding multiple materials to an object worked fine except for setting the Lamp to 'hemi'; my Blender version 2.73 doesn't seem to have this option where and when the tutorial asks for it. Perhaps I'll find it someday.
For now, I did see how to attach materials settings to individual parts of an object. Very easy! I wonder about all the useful applications of this, where I might have an object or character that has a design or multi-colour aspect.
Observe:


For now, I did see how to attach materials settings to individual parts of an object. Very easy! I wonder about all the useful applications of this, where I might have an object or character that has a design or multi-colour aspect.
Observe:
Saturday, 21 February 2015
Quick update on modelling in Blender
My 'person' tutorial from a the past few days is finished, with hat in place. I'm going quickly into materials and textures tutorials, so for now I'll just share what you'd end up with if you follow the tutorial I did.


Again, I'd like to share that the wikibook tutorial is well-written and easy to follow.
Friday, 20 February 2015
Blender progress with wikibook: simple person in progress
Simple person tutorial finished
After several short sections, my person is finished. Soon I'll be adding a hat. FYI, the tutorial is found at a wikibook link called Blender 3D: Noob to Pro and it's very easy to understand. I'm using Blender 2.73 and the tutorial works fine. Some older tutorials I found were difficult just because keyboard shortcuts and other instructions didn't seem to work with 2.73, which is currently the latest stable release of Blender.
I'm starting to get an idea of all the modification and sculpting one can do with basic geometric building blocks and "modifiers." Then, apparently, so much more can be done physics simulations, textures, bones, and rigging. Between cgcookie.com's Blender tutorials and the Noob to Pro wikibook, I'm having fun and getting a good, organized feel for the software. I think it's a good sign that already, just a week or so into the process, I'm starting to get ideas for characters I want to model and environments I want to construct in Blender.
Then I get inspired and get out my pastels or watercolours and draw quick sketches as usual to keep track of ideas and try them out with my trusted tools.
Here's my completed person, at several stages of modification today.


Computer hardware issues
I'd like to mention that I haven't found any hardware problems. I'm using a one-year-old iMac, base model with 16 GB memory, and it works fine. In the olden days, an ordinary personal computer wouldn't run programs that involved 3D calculations, I recall, and we always had extra processors in my family's computers to make sure drafting programs like AutoCad would run alright.
It's very exciting to me, to see people without any drafting background able to work with an open source program that does extremely accurate visuals without having to struggle so hard and rely on technical math, programming, and drafting principles.
And it looks awesome! I dare ya to search Google for Blender samples of graphics and animations. Films too, don't forget those! Here's one page of samples that I like: 27 Inspiring Blender Animations.
Thursday, 19 February 2015
Blender exercises going well using wiki books
I'm following two sources to learn Blender so far. After some trial and error, I found that http://cgcookie.com and http://en.wikibooks.org/wiki/Blender_3D:_Noob_to_Pro/ have good tutorials and information.
Cgcookie has some free tutorials, and many more are available which look useful once you join their modest $18/month membership. I may just join them myself. I'm doing approximately one free tutorial per day, and I predict that finding good ones for free will eventually become frustrating. Rather than seek endlessly for free learning, I'll probably be ready to pay up for some respected course or tutorial membership site. Meanwhile, perhaps like you, I want to learn enough to understand what I'm getting involved with.
Unsurprisingly, learning Blender is invigorating my traditional art practice as well. I have made two drawings that were important to me, in the past two days. I recall saying the same thing three days ago, too! I also want to learn Corel Painter but that one is further down my list right now for practical reasons - I have upcoming projects that will benefit from understanding Blender and 3D animation.

As the day (and week) progresses, I'll add more pictures. The next part of the tutorial starts to look a little more like a normal human figure!
Cgcookie has some free tutorials, and many more are available which look useful once you join their modest $18/month membership. I may just join them myself. I'm doing approximately one free tutorial per day, and I predict that finding good ones for free will eventually become frustrating. Rather than seek endlessly for free learning, I'll probably be ready to pay up for some respected course or tutorial membership site. Meanwhile, perhaps like you, I want to learn enough to understand what I'm getting involved with.
Unsurprisingly, learning Blender is invigorating my traditional art practice as well. I have made two drawings that were important to me, in the past two days. I recall saying the same thing three days ago, too! I also want to learn Corel Painter but that one is further down my list right now for practical reasons - I have upcoming projects that will benefit from understanding Blender and 3D animation.
Today's tutorial exercise - modelling a basic human figure
Following a tutorial in Noob to Pro, I was able to produce a basic building-block figure without flaws, following very clear instructions:As the day (and week) progresses, I'll add more pictures. The next part of the tutorial starts to look a little more like a normal human figure!
Monday, 16 February 2015
Finished a comic today - Melon and Jelly
I have some plots ready to apply to some cartoony cat characters that I recently developed on paper, after their living in my mind for sooo long.
One image is finished, entirely created in ink. I'm waiting for some camera equipment to charge up so I can photograph it in my highest quality for archiving, in case I'm famous some day. Meanwhile, I have cell phone photos to share.
Then I needed images of how a cat looks when clinging to a tree. That was easier, thanks to a Google image search. After that, I had enough technical info to begin drawing on illustration paper. I also knew that I wanted to use ink, because I received so many interesting and supportive comments for my only ink painting so far which hung in a gallery a few months ago. This image will be ink success #2!
The 'cat up tree' image is only my second ink drawing that is fully painted with ink. I'm not sure ink is meant to be used this way, but I like how it looks, so I'll keep doing some pieces this way.
Unfortunately I constantly forget that some inks are opaque, and many of mine are transparent. It's challenging to lay down colour such as white, to hide a mistake or change some shapes. For example, my little cat standing on the floor was intended to be a beige colour, but once the brown dried, white glazes looked strange, and I found that pinks subdued my harsh brown much better than white did. Between the start and finish of this image, I added white and cool grey to my collection of colours, so that I can make beige, and subtle shadows for occasions like this, where the whole page is going to be filled with colour.
It would also be ideal to take the time to add tones before diving greatly into colouring for these situations. For some reason, I feel compelled when using ink, to just dive right in and colour the items. Maybe it's the nature of acrylic. It dries quickly and you can address one piece of an image at a time, quite differently than working with watercolours.
Subsequent comic panels will probably be made digitally with Painter or iPad apps like ArtRage or ProCreate, or minimally-inked, to save time and get my ideas out quickly.
I like how the flying bug turned out; he seems to be glowing and appealing to the blue cat Melon. The little guy on the floor kinda stuck in my mind to be a slower-moving character, so I'm glad he or she (I still haven't decided) looks cute and cuddly in pink, since my attempted beige didn't work. I was surprised how painstaking it was to create highlight and shadow sides to the tree and cat. The shadow portions involved grey sometimes, and other times just more brown, and yellow and white helped produce highlights. With practice, I'm sure this task will become easier. As I said before, acrylic ink dries quickly, including the stock on my palette where I was trying to mix lighter and darker shades for the tree and Melon (the blue cat). Now that I think of it, the pink cat should probably be female. Seems obvious now. But we'll have to wait and see! I guess that's my comic strip cliffhanger for you today.
FYI- all images everywhere on my blog are All Rights Reserved. Do not copy or use the images in any commercial manner, such as printing to post on your wall or pasting into your website. I will consider requests to use images for academic and personal purposes, and I'm available for hire for commercial image creation and am willing to discuss rights management arrangements for digital, merchandise, and other rights to commercial and personal usage of my images.
One image is finished, entirely created in ink. I'm waiting for some camera equipment to charge up so I can photograph it in my highest quality for archiving, in case I'm famous some day. Meanwhile, I have cell phone photos to share.
In the beginning
The idea was an intro to the characters: one cat stuck in a tree, doing what kitties do, and the other patiently trying to get his or her attention. I wanted to try a perspective drawing, so the tree cat would be close up and in your face, to emphasize how animal instincts take over. First I collected photos of plants. I sketched plants. I wandered suspiciously in the garden outside my apartment building, with a clipboard and sketchpaper in hand. My drawings turned out pretty well, but there wasn't really an ideal specimen to practice on. It needed to be a houseplant, like a potted tree or something sturdy enough to (sorta) support the weight of a cat climbing it.Then I needed images of how a cat looks when clinging to a tree. That was easier, thanks to a Google image search. After that, I had enough technical info to begin drawing on illustration paper. I also knew that I wanted to use ink, because I received so many interesting and supportive comments for my only ink painting so far which hung in a gallery a few months ago. This image will be ink success #2!
 |
| Plant shaping up with perspective |
 |
| Cat body in progress |
 |
| Background colours starting to appear |
Inking gone wild
When working with ink, I have difficulty deciding where to start. So, I usually start filling in some colour, similar to adding mass or tones in an underpainting. With ink, I'm not sure how one does an underpainting, so since I'm using acrylic ink, I treat it a bit like an acrylic painting, where subsequent colouring covers over even the most bold initial marks.The 'cat up tree' image is only my second ink drawing that is fully painted with ink. I'm not sure ink is meant to be used this way, but I like how it looks, so I'll keep doing some pieces this way.
Unfortunately I constantly forget that some inks are opaque, and many of mine are transparent. It's challenging to lay down colour such as white, to hide a mistake or change some shapes. For example, my little cat standing on the floor was intended to be a beige colour, but once the brown dried, white glazes looked strange, and I found that pinks subdued my harsh brown much better than white did. Between the start and finish of this image, I added white and cool grey to my collection of colours, so that I can make beige, and subtle shadows for occasions like this, where the whole page is going to be filled with colour.
It would also be ideal to take the time to add tones before diving greatly into colouring for these situations. For some reason, I feel compelled when using ink, to just dive right in and colour the items. Maybe it's the nature of acrylic. It dries quickly and you can address one piece of an image at a time, quite differently than working with watercolours.
Subsequent comic panels will probably be made digitally with Painter or iPad apps like ArtRage or ProCreate, or minimally-inked, to save time and get my ideas out quickly.
 |
| Green ground balances green leaves perhaps |
 |
| Still learning colour mixing |
Close to finishing
 |
| Background became golden to help plant stand out |
 |
| I decided on blue, no surprise...I like bright colours |
 |
| Don't drink the water! The coffee is okay, though |
 |
| Cats are starting to have faces and details |
 |
| Still not quite finished...and it's been a long process |
Finally success!
 |
| The finished piece by Heidi Bada |
Images are provided for entertainment; please don't copy without discussing with me first.
FYI- all images everywhere on my blog are All Rights Reserved. Do not copy or use the images in any commercial manner, such as printing to post on your wall or pasting into your website. I will consider requests to use images for academic and personal purposes, and I'm available for hire for commercial image creation and am willing to discuss rights management arrangements for digital, merchandise, and other rights to commercial and personal usage of my images.
Sunday, 25 January 2015
New pastel pencils today
I was tempted to try a few different brands. So, I chose a few useful colors in 2 different brands. You can see them in the photo below.
I just was trying out the new tools, and produced a landscape that felt like Parksville. I thought I might as well share it!
I like all of the new pencils. I chose two brands, and one is softer while the other feels a bit harder and faster moving on the paper. Conte a Paris is softer, and more slow moving (I'd say) as it is quite capable of laying down pigment on the page with little pressure. Koh-i-noor seems a bit harder, and more able to keep a sharp point. That could be helpful for slight edging on items you want to pop out of the background or to separate from adjacent objects.
I also purchased one soft pastel stick. I've never used one before, so it was just an experiment. You'll see it in the photo below in the sky and the sandy foreground as a bright sunlight yellow area. The Brand is Schminke and it too is very soft and grippy on the paper. It takes very little effort to get a lot of color onto the page. I will enjoy using these again although I only own one so far, because it will blend beautifully with pastel pencils or PanPastels.
FYI- PanPastels is both a brand and a description. The product is powder rather than in a stick form, and is sold in little plastic containers. You apply the powder to paper using sponges typically.
I will keep practicing with these pencils and you'll see my progress over time. I'll also try to figure out if I can turn this photo 90 degrees counter-clockwise without having to email it to myself from my phone.

Saturday, 24 January 2015
Park photo using cell photo
I took some photos while passing by some woods. It was one of those late afternoon, winter scenes that gives golden light. All I had on me was a cell phone, and I'm delighted with the results. The photo is very close to what I recall seeing with my eyes.
Just a reminder to take photos of everyday scenes. Include people you know, or people you don't know. Or, just record the situation as-is, with no story or personal attachment. As far as I'm concerned, this photo is simple beauty and nature. Ironically, the parkland is located next to a busy, noisy highway.

Thursday, 22 January 2015
Latest sketching practice - erasing for highlights
Right now I'm working through some materials that teach life drawing. I'm doing this so that I can draw better cartoons. But before I get to life forms, it says I'm supposed to practice using different strokes, pencils, pressures, etc.
Here is a sample of a fun way to create highlights gently using a kneaded eraser. Clearly I'm no expert in drawing plants!

Tuesday, 30 December 2014
Tiffany Kitty has a teardrop
I made a quick animation using a drawing I made yesterday with Photoshop. The animation is done in Toon Boom Studio. Photoshop was just acting strange so I went with TBS then it was acting stupid, so I restarted it, a few times, and it eventually worked. The result is below, with no audio added yet. When I'm ready to make a few kitty sound effects, I'll try to add them. I've not tried that in TBS yet, so it's a good opportunity to familiarize myself with those tools; Photoshop requires audio to be produced elsewhere, then imported, which is a pain in the butt for a simple project like this.
Let me know if you like my kitty drawing too. It took about 4 hours to complete the whole drawing with Photoshop and a Wacom tablet, but it turned out exactly as I pictured it in my head for a change, including the slightly dramatic lighting.
Ok...now I don't like how YouTube replaces my video at the end with a bunch of thumbnails...so I slowed it down so you can be sure to see the final speech bubble. Sorry for confusion, but YouTube doesn't have a quick way to replace a video once it's uploaded.
Let me know if you like my kitty drawing too. It took about 4 hours to complete the whole drawing with Photoshop and a Wacom tablet, but it turned out exactly as I pictured it in my head for a change, including the slightly dramatic lighting.
Ok...now I don't like how YouTube replaces my video at the end with a bunch of thumbnails...so I slowed it down so you can be sure to see the final speech bubble. Sorry for confusion, but YouTube doesn't have a quick way to replace a video once it's uploaded.
Saturday, 27 December 2014
How to attach Floaty orange foam to back door of GoPro
Two things confused me when I opened the package.
1) Why are there two different plastic doors provided? I found the answer on the GoPro.com website, after finding no instructions on the package. One is for the dive housing, and one is for the standard housing that comes with the camera.
2) How to you peel off the backing so you can stick the foam on? I tried tugging at the orange tape, but it looked several times like I'd ruin the dense grey foam underneath. I didn't want to tear the grey foam. However, that whole orange backing has to be parted from the slim grey foam, so that the orange foam block can then be firmly pressed on (centre first so you don't get air bubbles) with some give provided by the grey stick foam which is very sticky when that orange peeling is removed. I got the sticky grey foam exposed, hovered the orange block over the standard housing (I don't have a dive housing) and pressed down evenly and hard. I should've pressed in the centre first to squeeze out air, but still it seems very firmly affixed now.
Then, I needed to learn how to switch doors from the standard see-through to my new Floaty orange back door. It turns out it's very easy. The manual (downloadable from GoPro.com) shows exactly how to do it, and basically you open the housing all the way, and pull straight down so the door unseats itself from the bottom of the plastic hinge. I wonder how the plastic will hold up to frequent use, changing between the standard, open-back, and Floaty back doors. Let's hope it's really sturdy plastic, as it seems to be.
1) Why are there two different plastic doors provided? I found the answer on the GoPro.com website, after finding no instructions on the package. One is for the dive housing, and one is for the standard housing that comes with the camera.
2) How to you peel off the backing so you can stick the foam on? I tried tugging at the orange tape, but it looked several times like I'd ruin the dense grey foam underneath. I didn't want to tear the grey foam. However, that whole orange backing has to be parted from the slim grey foam, so that the orange foam block can then be firmly pressed on (centre first so you don't get air bubbles) with some give provided by the grey stick foam which is very sticky when that orange peeling is removed. I got the sticky grey foam exposed, hovered the orange block over the standard housing (I don't have a dive housing) and pressed down evenly and hard. I should've pressed in the centre first to squeeze out air, but still it seems very firmly affixed now.
Then, I needed to learn how to switch doors from the standard see-through to my new Floaty orange back door. It turns out it's very easy. The manual (downloadable from GoPro.com) shows exactly how to do it, and basically you open the housing all the way, and pull straight down so the door unseats itself from the bottom of the plastic hinge. I wonder how the plastic will hold up to frequent use, changing between the standard, open-back, and Floaty back doors. Let's hope it's really sturdy plastic, as it seems to be.
What I've been working on lately
There's so much to tell. I've been away from my blog and just want to tell you why -
I've been trying out Hype 2 software for HTML animation, studying fantasy drawing and cartoon drawing, celebrating Christmas and busyness in the stores, baking, decorating my apartment, and doing gigs on Fiverr.com, and other on-demand sites.
I ordered a few mugs and a tote bag on society6.com. I'm very pleased with the finish and quality. I wish the tote bag was more rugged, and I'd be willing to pay for that, but the quality is good and the price is right, meanwhile. My drawings looked excellent on those products, which I gave for gifts at Christmas.
As always, I'm trying out pastel and charcoal drawing techniques. It's a lot of sketching, that isn't really worth showing. Just for practice. My goal right now is to finish a cat drawing I just made specifically for a comic panel. So this one will be different from others I've shared on society6 products and Fineartamerica, and everywhere else, because it'll serve as a sample of my style to be shared on cartoon forums such as penciljack.com.
During this week between Christmas and New Year's, I hope to settle on fewer, more focused forums and social media for sharing my ideas, art, and services. Fiverr.com is a definite yes; my newly recreated Facebook page is too. I will likely drop instagram and even twitter, in favour of routinely participating on Fineartamerica.com, deviantart.org, penciljack.com, cgsociety.org, and maybe even flicker.com because they offer opportunities for showing work, getting critiques, and getting hired!
Watch for news in the new year.
Happy holidays,
Heidi
I've been trying out Hype 2 software for HTML animation, studying fantasy drawing and cartoon drawing, celebrating Christmas and busyness in the stores, baking, decorating my apartment, and doing gigs on Fiverr.com, and other on-demand sites.
I ordered a few mugs and a tote bag on society6.com. I'm very pleased with the finish and quality. I wish the tote bag was more rugged, and I'd be willing to pay for that, but the quality is good and the price is right, meanwhile. My drawings looked excellent on those products, which I gave for gifts at Christmas.
As always, I'm trying out pastel and charcoal drawing techniques. It's a lot of sketching, that isn't really worth showing. Just for practice. My goal right now is to finish a cat drawing I just made specifically for a comic panel. So this one will be different from others I've shared on society6 products and Fineartamerica, and everywhere else, because it'll serve as a sample of my style to be shared on cartoon forums such as penciljack.com.
During this week between Christmas and New Year's, I hope to settle on fewer, more focused forums and social media for sharing my ideas, art, and services. Fiverr.com is a definite yes; my newly recreated Facebook page is too. I will likely drop instagram and even twitter, in favour of routinely participating on Fineartamerica.com, deviantart.org, penciljack.com, cgsociety.org, and maybe even flicker.com because they offer opportunities for showing work, getting critiques, and getting hired!
Watch for news in the new year.
Happy holidays,
Heidi
Monday, 8 December 2014
Productivity with book Draw Out the Story
Did a short promotional comment on YouTube today for this book on making comic books. It's at my local library or at Bolen's. Covers the basics to get started, and it's easy to follow till you get the hang of following through with a story you want to write.
Sunday, 7 December 2014
My first HTML5 animation was a success, now visible on Youtube and my website
After some experimenting with the capabilities of Hype 2 on the Mac, I came up with a short animation about Christmas and cats that I have shared on Youtube at http://youtu.be/ITsWH0Rzigc and on my website www.patiostudioproductions.biz. Full audio is only included in the website version, because exporting to video doesn't seem to include audio.
Let me know what you think, there or here in the comments.
Here's the YouTube version, but it's better to see the website version because it utilizes the audio files and original HTML and graphics files.
Now that I know Hype 2 works well, and is very easy to use, I am excited to come up with more compelling stories. I can justify putting time into complete cartoon or line art illustrations, with suitable components to be animated with HTML5 and Javascript. For my samples, I am planning to make a few educational and entertainment pieces. My college and university studies offer lots of enjoyable subjects to choose from, that I'll try to show in a funny or unique (but compelling) way. For entertainment, I have a few cartoon characters that I draw frequently and would love to portray in animated stories. Not to mention promotional animations for my own and others' websites.
It's exciting, especially after I decided Madefire's online animated comic book creation tool seemed to have an unnecessarily dark and mysterious learning curve. My project there failed three times, and I say that's the end of that!
Madefire out...Hype 2 in. Plus, Hype 2 creates HTML5 assets ready for FTP upload. I've never used an FTP client before, but on short notice, and strong desire to show off my Christmas cat and tree animation, I figured it out (using FileZilla) and it worked perfectly. The first and only thing you'll see on my 'practice' website space (www.patiostudioproductions.biz) is that cat and tree animation!
Let me know what you think, there or here in the comments.
Here's the YouTube version, but it's better to see the website version because it utilizes the audio files and original HTML and graphics files.
Now that I know Hype 2 works well, and is very easy to use, I am excited to come up with more compelling stories. I can justify putting time into complete cartoon or line art illustrations, with suitable components to be animated with HTML5 and Javascript. For my samples, I am planning to make a few educational and entertainment pieces. My college and university studies offer lots of enjoyable subjects to choose from, that I'll try to show in a funny or unique (but compelling) way. For entertainment, I have a few cartoon characters that I draw frequently and would love to portray in animated stories. Not to mention promotional animations for my own and others' websites.
It's exciting, especially after I decided Madefire's online animated comic book creation tool seemed to have an unnecessarily dark and mysterious learning curve. My project there failed three times, and I say that's the end of that!
Madefire out...Hype 2 in. Plus, Hype 2 creates HTML5 assets ready for FTP upload. I've never used an FTP client before, but on short notice, and strong desire to show off my Christmas cat and tree animation, I figured it out (using FileZilla) and it worked perfectly. The first and only thing you'll see on my 'practice' website space (www.patiostudioproductions.biz) is that cat and tree animation!
I can't believe Society6 favourited one of my tweets!
I suggested something on Twitter, and they noticed. Click on the photo to see it bigger.

Follow me on Twitter @frisky650 to enjoy my other stunning comments.
Follow me on Twitter @frisky650 to enjoy my other stunning comments.
Facebook page updated today.
Check out out my new facebook page. I'm going to share my news there, just like I do on the blog, to catch attention from people who are regularly on there.
I don't seem to get comments on the blog, but I do get a lot of views. Facebook seems easy to start conversations, of course. But the blog allows me to share longer posts. I probably ought to just keep both in my radar for keeping in touch and sharing my own news.
So you can follow my Facebook page, like it, and leave comments just like you do on any other Facebook profile you like. I'll follow your news too.
Friday, 28 November 2014
Audacity with Mustang I amp
Today I finished a video made of many photos and short video clips. The last step was to add a guitar track. I figured it would be easy to use my iRig for iPad, but that involved downloading an app with a bit of a learning curve so I gave up. I need a track added today.
So I tried using the USB cable straight from my Mustang I amp to the Mac. Audacity didn't recognize it so I sought help online. It sounded complicated, to add drivers and get into some awkward audio settings in the Mac. Then I thought, now that everything is set up and hooked together, guitar and all, what if I just reboot the computer?
Macs are pretty smart. So is Audacity. And the price is right, for this open source software (free)!
When I opened Audacity, I was delighted to find that the audio input included my usual built-in microphone, and a Fender Mustang choice. I was shocked it was so simple.
When I selected the amp as the input device, and started recording and playing, it recorded the guitar and nothing else. Fantastic! I laid a few tracks. The only issue I've found is that the guitar was recorded at a fairly low level, even though the amp and guitar were nearly maxed out in volume controls. Some people have commented online with various settings that repair that or prevent it.
Given this was my first try, I'm delighted with the results. I boosted the level of the tracks, exported to an AIFF file, and imported it as an audio track in Photoshop to be compiled with my video tracks. Next time the whole process will be easier and I'll produce something that I can show as a sample, and I'm excited to be making progress with my guitar playing too. I only started playing this year, after a few rough starts when I was younger, so now I can add my own guitar tracks when necessary. I've also got the hang of video editing in today's software, and getting more practice with making small video projects in my neighbourhood and family, almost on a daily basis.
Yesterday I took my new GoPro camera up Christmas Hill park, to get a view of the region all from one spot. It worked great, and that too has a learning curve. GoPro comes with it's own software to edit and prepare files. Given that the HD and better resolution files are relatively huge, I want to keep the process manageable on my basic iMac. When you open video files, and start adding music, voice tracks, and multiple tracks of annotation and animated graphics, the computer indeed does struggle to keep up. I'm grateful it doesn't actually crash, but one needs to be patient with huge Photoshop files.
Monday, 24 November 2014
Educational video graphics sample in progress
It's already been a few weeks since I studied an intense intro to motion graphics. I gathered some footage to practice with and decided on an educational roadside ecology lesson, that takes me back to college when I learned a lot about Garry Oak trees.
This project ate up my time today, in addition to going for a long walk in Swan Lake park that resulted in getting drenched during a moderate rain spell.
It's about 10:00pm and I'm still a bit damp feeling from that walk, while I work on my Garry Oak video clips.
I'm busily creating new samples of my recent interests like animation and motion graphics. This video may not need motion elements, because it's already filled with short segments of different features of trees, and I'm not adding any cartoon characters...or maybe I should!
It's all good practice. Adding and/or animating elements in a video, such as text overlays, requires a sense of timing and generally a sense of usefulness. I've decided that the audience for this sample video is 10-12 year olds. I don't have quick and easy access to lots of terminology about ecological and biological features of trees; college was a long time ago and I don't remember the specifics.
A little animation may draw attention, without overpowering or dominating the visuals of the trees themselves. I'm most interested in practicing with the pen and brush tools to see if I can produce a line that connects the terms to the tree in an animated fashion.
Luckily, with practice, the techniques I learned in the tutorial (off lynda.com) are getting easier and more precise, and they tie in nicely to basic graphic design principles I've also studied in the past, which keep me from going overboard with animation (hopefully).
I'm sure you readers will let me know if anything looks wrong!
Monday, 17 November 2014
Some screen shots from the action while making animated characters the past few days
I've uploaded the samples of a few recent simple character animations to YouTube, and wanted to show off some screen shots too, so you know what the Toon Boom interface is like. Some conversations online make it difficult to choose among Toon Boom Studio and products like Flash and Anime Studio Debut. I personally didn't like Anime Studio, and have never used Flash so I can't comment on any comparison yet.
Here's a hint at what working with Toon Boom Studio animation software is like. First, a character with bones and "zones of influence":
A character following a "motion path":
Adjusting with cut-out animation tool:
And some screen shots of the interface while working with my stick figure:
Here's a hint at what working with Toon Boom Studio animation software is like. First, a character with bones and "zones of influence":
A character following a "motion path":
Adjusting with cut-out animation tool:
And some screen shots of the interface while working with my stick figure:
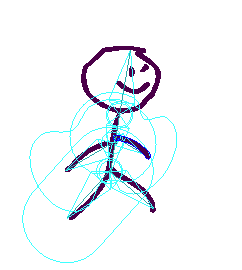 |
| 'Zones of influence' for bones are visible; not sure what they do yet! |
 |
| Leg 'bone' selected and can be rotated about the hip attachment point |
 |
| Motion path with keyframes along the line spanning 5 seconds, at 12frames/sec |
 |
| Timeline shows several layers are created to enable motion of each limb |
The tricky part of using sophisticated animation software, it seems, is to use the right tool for each task, and select the right layer and timeline position every time, before making an adjustment. One suggestion to Toon Boom already: make icons bigger!!! It's very difficult to tell which view is selected, between Drawing View, Camera View, and the side & top views.
Subscribe to:
Posts (Atom)